By Keith Thomassen, PhD, CFII
First published in Flight Levels Online, Spring 2014 issue

There are many facets to using an autopilot with your GPS that need to be understood. Fortunately, despite the fact that there are many different GPS navigators, and many different autopilots, there are some fundamentals at play that are essential to know. First, by choice of autopilot mode you can interface to either the analog or digital commands sent by your GPS. These commands are generated by your position relative to the location of the active leg of your flight plan.
Recall in the 2nd Tip in this series that flight plans are a set of flight legs that you will normally follow in sequence, and that there are just 23 specific legs authorized by the ARINC standards that can be used for GPS courses. Each leg is described by a course and the condition that ends that leg (reaching a waypoint, an altitude, an intercept, a distance, a DME distance, or a Radial). So clearly the first thing to understand in your airplane is which of these legs your GPS can create. If it can’t create it, there will be no signal for an autopilot to track it.
The early GNS 430/530 devices created a small set of these legs. Curved legs were added by WAAS upgrades, but there are still significant omissions. The GNS 480 and Chelton were first to create them all, as now do the G1000 and new GTN series (except the RF leg used in RNP procedures). However, even if the device creates them, there may not be autopilot signals on some of them. For example, there are five kinds of heading legs (follow a heading and not a course) so unless your GPS has a magnetometer input (necessary but not sufficient) from an AHARS, it cannot compare what you’re doing with what is required. Therefore, it cannot create an error-correcting signal.
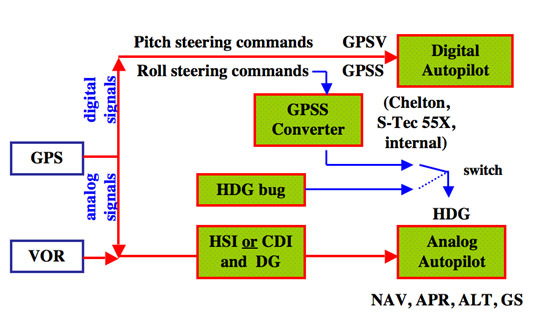
For each specific leg type you also need to know if there are analog signals (course deviation) for your CDI/HSI or only digital roll commands (as is true on all curved legs) that are sent directly to the autopilot. The roll commands can be converted to HDG commands if you don’t have a digital autopilot, in which case you put the autopilot in HDG mode and switch between these converted roll commands and normal HDG bug commands. This switch can be external, or built-in on devices like the Aspen PFD or Chelton EFIS. A converter is built into the S-Tec 55X so the switch is thrown by mode choice (GPSS) on the unit.
Finally, in the 7th Tip in this series vertical courses were described. These are created from ground antennas (glide slope), by baro-VNAV computed courses, or by GPS altitudes on a GPS glideslope. Signals are available on all of them for your autopilot. Analog vertical deviations signals (glideslope) are generated on an ILS and on GPS vertical approaches, which are sent to your CDI/HSI and tracked in the same way; intercept the courses from below in the ALT and APR modes to arm and capture them.
Digital pitch signals are also sent directly to an autopilot by some GPS units. In the Enroute and Terminal phases, both the Chelton and G1000 use baro-VNAV courses for step downs/ups and digital pitch signals are issued. The mode choice on the autopilot to track these varies by manufacturer. On my TruTrak Sorcerer I just select GPSV, but on a G1000 it is the VNV mode. The G1000 also has FLC and VS modes that issue pitch commands to maintain Speed and Vertical Speed respectively, against the chosen values.

On GPS approaches, the Garmin 430W/530W, 480, and GTN navigators issue digital pitch commands in addition to the analog deviation commands, so you can fly those GPS glideslopes by mode choice on the autopilot. All of the above ways to couple the GPS and autopilot are illustrated in Figure 1.
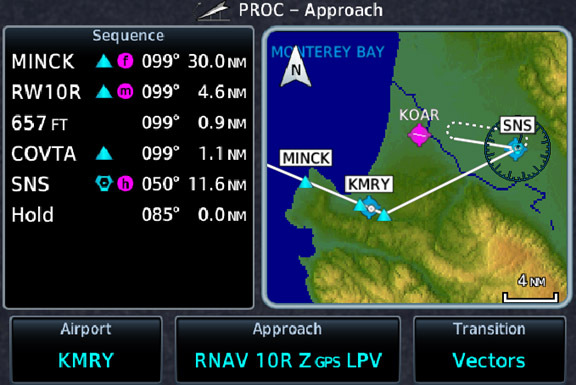
There are many flight operations where you need to make autopilot choices –– too many to cover here –– so let’s just illustrate operations on an approach and missed approach. On a flight from the north to Monterey, CA (KMRY), we’ll do the RNAV (GPS) Z approach to runway 10R. This is an LPV approach with a 679-foot DA and a TDZE of 193 feet, shown in Fig 2 (with the Vectors transition). The missed approach is to climb to 5000 feet D-> COVTA (straight ahead, 099°) then left to 049° to hold at the SNS Vortac at 5000 feet.

Both NAV and GPSS signals are sent on these two legs, but only GPSS signals are sent for the entry and hold (dashed racetrack lines in Fig 2). On the hold inbound leg (solid hold line in Fig 2), NAV signals are available as well.
You’ve been told to expect vectors so just Load the approach and activate VTF later. Assuming your active leg is to KMRY, you’ll likely be tracking that in GPSS mode (or NAV if you can’t), and perhaps using a VS mode of the autopilot to make a controlled descent.
When first vectored to the west, set the HDG bug accordingly and change to HDG mode on the autopilot (or if you have a converter, flip the switch that selects between HDG and GPSS). As you’re being vectored around, activate the approach. On the 430/530 Procedure menu, choose Activate VTF. On the 750, touch the title of the Approach in your flight plan then select Activate VTF on the pop-up menu.
As you’re vectored onto final you can use all digital modes if you have that capability, otherwise use the analog signals for the glideslope as you would with an ILS (switch to APR to intercept final, and select ALT mode when level at the FAF altitude). If your GPS sends pitch commands and your autopilot has a digital pitch mode, use GPSS to intercept final and arm the pitch mode (select ALT or GPSV on some autopilots, but read your manual).
After capturing the glideslope, your next action comes at the DA (we intend to fly the missed). Since this is a DA and not an MDA, you can’t go into ALT mode to level off and fly to the MAP, so decouple the autopilot at the DA and initiate a climb. You could now couple the horizontal course (NAV or GPSS) since you still have guidance to the MAP. But at the MAP sequencing is suspended on the 430/530 and GTN series (but not the 480).
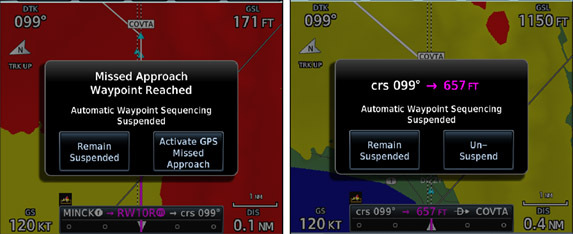
On the 403/530 you need to restore sequencing after the MAP by pushing the OBS button to turn off the SUSP light, then track the missed approach course in NAV or GPSS. On a GTN series you’ll be prompted to do the sequencing as shown in Figure 3. The screen on the left shows the prompt to restore sequencing at the MAP, and again (possibly) on the first part of the climb out.
Here, a CA leg is added (Course to Altitude) and the sequencing altitude is below the DA. This is to ensure runway course guidance if you drifted lower than the DA. Without this leg, the next one is D-> COVTA from wherever you are, like seriously off course. So until you reach the DA altitude, the course is aligned with the runway. (The 480 also adds this leg, but the 430/530 does not). This leg will sequence automatically if you have AHARS input to the GPS, but if you don’t the screen on the right shows the prompt you’ll get to sequence to the DF leg (Direct to a fix) to COVTA.
Finally, your autopilot choices after the MAP are again the NAV or GPSS modes to track the legs to the hold, but at the hold you need to use the GPSS mode for entry and outbound legs. Otherwise you’ll need to manually fly those. On the inbound leg you have both choices again.
